Showing posts with label Italian baking. Show all posts

Thursday, June 16, 2016

Bread Baking Babes gaan op de gezonde toer.

(recipe is also in English)
Deze maand is het mijn beurt om een recept te kiezen voor de maandelijkse Bread Baking Babes uitdaging.

Ik heb een broodrecept gekozen dat supergezond is, het is namelijk volkoren + nog flink wat extra zemelen. Sommige mensen hebben moeite 100% volkoren dat niet droog is en/of een baksteen, maar dit is nog even een groter uitdaging.

Het is een Italiaans recept van de kokende tweelingzussen Silimi, die in Italië heel bekend zijn.

Sorelle Simili.jpg
Margherita and Valeria Simili
Ik heb het recept in 2008 al een keer eerder gebakken, maar heb helaas geen aantekeningen erbij gezet, dus ik had geen idee of ik het recept braaf gevolgd heb, of veranderingen heb gemaakt. Ook kan ik niet meer nagaan hoeveel zemelen ik extra heb bijgevoegd, het recept spreekt nl van 50-100 gram extra. En dat is aardig wat, omdat zemelen niet veel wegen. In het boek waar het recept uit komt wordt verteld dat een leerling van de bak- en kookdames dringend adviseert om niet meer dan 50 g te gebruiken, omdat je anders het gevoel krijgt dat je spaanplaat aan het eten bent. Dus het zal spannend zijn wie wat aandurft.
zemelen (fijn)

Het zal ook aan je volkorenmeel liggen, of het grof of fijn volkoren is. Mijn ervaring is dat grof volkoren luchtiger is, omdat er minder stukjes zemelen de glutenstructuur verstoren. Ook de zemel kan fijn of grof zijn en dat maakt dan ook verschil. Ik heb het onderstaande recept eerst met fijne zemelen gemaakt.De hoeveelheid water is daardoor ook verschillend, want de ene neemt meer op dan de ander. Je moet echt je bakkerservaring aangespreken om tot een goed deeg te komen. Want laat je het te droog, zal je misschien echt het gevoel krijgen dat je spaanplaat eet.
In het brood worden walnoten or rozijnen toegevoegd, maar je kunt ook een combinatie nemen of een andere soort noot of fruit. Het is wel beter om ze vooraf te weken, zodat ze niet later vocht aan het deeg onttrekken.


Er wordt ook melkpoeder gebruik, waarvan gezegd wordt dat het aromatischer is en een vollere smaak heeft, maar je kan ook melk gebruiken (of een deel melk) in plaats van water. De uitdaging is dus hoeveel zemelen durf je aan, zonder dat je spaanplaat of karton zit te eten straks.
Ik moet zeggen het lukte beter dan ik had verwacht, ik heb eerst 75 g tarwezemelen (per recept) gebruikt, en dat met grof volkorenmeel en fijne extra zemelen.

2 manieren: 2e= links, 1e = rechts
Ik heb ook nog even twee methoden van kneden uitgeprobeerd.

De eerste. Het deeg werd gekneed zonder de extra zemelen, zodat zich al een mooi glutennetwerk kon  vormen. Ondertussen weekte ik de zemelen met wat water. Ik heb minder water ge bruikt dan in het recept, maar dat hangt dus van de zemel af. Als het deeg al aardig elastisch wordt, zet je de machine uit en laat je het minstens 8 minuten rusten. Daarna voeg je de geweekte zemelen toe en  kneed je die erdoor.

De tweede. Alle ingrediënten (behalve rozijnen en noten) tegelijkertijd in de kom en kneden tot ik een vlies kon trekken van het deeg (niet te hard laten draaien in de standmixer, ik deed het op 1) Ik gebruikte her 40 g minder water, toch waren beide broden even sappig.

Het maakte niet extreem veel verschil, bij de eerste methode had ik de indruk dat de luchtgaatjes iets beter verdeeld waren, maar niets schokkends.
Ik heb 100 g geweekte rozijnen en 100 g gehakte pecannoten gebruikt per recept. 

Het brood heb ik 40 minuten laten bakken, Ik had er één brood van gemaakt en dat heeft het echt die tijd wel nodig. Als het brood te donker wordt bovenop, gewoon even afdekken met alufolie.

De volgende dag aten we het voor het ontbijt. Onze zoon heeft het liefst zo licht mogelijk brood (lees: wit), dus hij nam het niet en at het brood van gisteren (volkoren!). Maar mijn man is dol op dit brood, hij vindt hoe meer zemelen, zaden, pitten of granen erin zitten, hoe beter. En dus was dat een groot succes.

Whole wheat bread with 
100 g added coarse wheat bran
Zelf heb ik mijn brood het liefst... steeds anders (soms, wit, soms volkoren en soms ertussen in), zolang het maar geen baksteen is of te droog. En dit brood was echt lekker, eerlijk gezegd had ik toch een beetje verwacht dat het 'te gezond' zou smaken. Helemaal goed, en die rozijnen vond ik echt een heerlijke toevoeging. Dus voor mij was het een succesvol recept... nu nog met 100 g zemelen!

En wat denk je? Het kan echt, ik heb nogmaals het recept gebakken, nu met 100 g extra zemelen. Nu een grove zemel (de andere was op). Het leek wel een berg toen ik het afwoog, ik weekte de zemelen met 300 g water en dat was toch iets te veel, dus moest ik later meer volkorenmeel toevoegen.Nu denk ik, ik had de zemelen gewoon moeten uitdrukken. Ik heb weer een lang brood gebakken in mijn casino bakblik (zonder deksel) en ik heb de 1st genoemde methode van kneden gebruikt. En het lukt prima! Niks geen spaanplaat.

Heb je nou ook zin om mee te bakken, dan kan je onze Bread Baking Buddy worden. Ik verzamel dan alle baksels in een bericht op mijn post en stuur je een Bread Baking Buddy Badge, die je (als je een blog hebt) bij je bericht op je blog kunt plakken.

Vertel hoe het ging, hoeveel zemelen heb je gebruikt? Stuur je naam, blognaam, bericht url en een foto van je brood naar mij notitievanlien(apestaartje)gmail(punt)com.
Deadline 29 juni. Dus pak je zak zemelen en bakken maar.
Je kunt ook nog even bij de andere Bread Baking Babes kijken (links in de linkerkolom) wat die ervan gebakken hebben.

Zemelenbrood
(2 kleine of 1 groot brood)
(recept PRINTEN)
500 g volkoren tarwemeel
300-380 g water
50-100 g (biologische) tarwezemelen (ik gebruikte 75 g)
+ Extra water voor de zemelen  (± 2 g water per 1 g zemelen, maar dit hangt af de zemel, (dus niet te veel water toevoegen aan het begin, dat kan je beter later bijsturen)
20 g verse gist of 7 g droge gist
1 el gerstemoutstroop of honing
30 g boter
1,5 tl zout
50 g melkpoeder
200 g walnoten (of andere noten) grof gehakt (of 200 g rozijnen of ½-½)

Meng de gist met ¾ van het water, moutstroop, boter, melkpoeder en zemelen. Voeg wat volkorenmeel erbij en het zout, als het gemengd is, voeg je de rest van het volkorenmeel erbij en meng de ingrediënten (met hand of standmixer), voeg meer water toe als het te droog wordt.  De zemelen zullen nl. nog vocht opnemen en anders wordt het brood te droog. Kijk na 10 minuten of je nog extra water toe moet voegen, doe dat indien nodig. Het is niet een nat deeg, maar moet wel vochtig en een beetje plakkerig aan voelen.

Nu ga je het deeg kneden met de hand of de standmixer op een niet te snelle stand (1) en neem de tijd om de gluten te ontwikkelen. Het deeg moet uiteindelijk elastisch zijn (je kunt er een vlies van trekken, ook al wordt dat bemoeilijkt door de zemelen).
Vorm het deeg tot een bol, plaats het in een licht ingevette kom en dek af met plastic, laat het een uur rijzen op een warme plek.
Terwijl het deeg rijst, wel je de rozijnen ongeveer 20 minuten  in warm water, giet het water af, dep ze droog en laat ze op een doek nog wat verder drogen aan de lucht. Als je noten gebruikt kan je ook wellen (ik heb dat niet gedaan), dan ongeveer 40 minuten.

Keer het gerezen deeg op een licht ingevet (of licht bebloemd) werkvlak en druk het plat in een grote ovaal. Verdeel ⅔ van de noten/rozijnen over het deeg en vouw het deeg in drieën op. Druk het deeg weer plat en verdeel de rest van de vulling erover. Rol het deeg op en verdeel het in tweëen (voor 1 groot brood, laat je het zo). Maak de vorm die je wil, als je in een broodblik bakt maak je een rol met de breedte van het blik. Als je één brood wil maken zou ik dit niet tot een groot rond brood vormen, je hebt dan kans dat het midden niet gaar wordt.  Plaats het deeg op een bakplaat met bakpapier of een ingevet broodblik en dek af met licht ingevet plastic. Laat het rijzen op een warme plek, ongeveer 45 min. Controleer of het genoeg gerezen is door een bebloemde vinger zachtjes in het deeg te duwen, als de deuk direct terug veert, laat je het nog even langer rijzen, als de deuk niet weggaat of maar een klein deel, is het brood klaar om te bakken.

Je moet ondertussen de oven (liefst met steen en metalen bakje op de bodem om stoom te creeëren) voorverwarmen op 200ºC.

Snijd het deeg aan de bovenkant in en zet het in de oven, giet wat heet water of ijsblokjes in de metalen bak om stoom te maken en doe de deur snel dicht. Bak ongeveer 30-40 minuten, controleer of het brood ook van binnen goed is met een kernthermometer (± 96ºC). Als de bovenkant te bruin wordt, dek die dan af met een stuk alufolie. Neem de broden eruit als ze klaar zijn en laat ze volledig afkoelen op een rooster voor je ze snijdt.

(bewerkt naar: “Pane e roba dolce” - Sorelle Simili)

Bread Baking Babes go healthy

(Nederlandse versie KLIK HIER)

And it's time again for the recipe for the month of June. And surprise I("Notitie van Lien") am the Kitchen of the month this time.
Sorelle Simili.jpg
Margherita and Valeria Simili

I choose a recipe for June with health benefits….lots and lots of bran. It is a recipe by the Simili sisters (sorelle Simili), the famous cooking and baking twins from Italy.

I’ve baked this recipe once in 2008, but I didn’t add any remarks or notes to the recipe, so I don’t have a clue if I did follow the recipe or made adjustments and how much bran and extra water I used.It can be hard to make a 100% whole wheat loaf that is not like a brick and moist. This recipe is all whole wheat with bran added. 
The recipe suggest 50-100 g of extra bran…. And that is a lot, because bran is very light in weight. In the book they say that a student urged strongly to just use the minor quantity (50 g), because it would become like chipboard if you were to use more. So it might be daring to use more than the minimum amount, let us see what everybody chooses.
wheat bran

It will also depend on your whole wheat flour, I know that fine milled WW makes a denser loaf than when the bran is left larger and added back later to the rest of the flour.
Also you have to add extra water (and time to let it absorb it) with the bran. You really have to use your baker’s experience and gut instinct to get the right consistency.

There is an addition of walnuts, or raisins, or a combination. It might be a good idea to soak both on forhand, so they don’t substract any moisture from the dough.

There is an option to use milk powder, of which they say that it is more aromatic and has a fuller taste, but you can also use milk instead of water and leave the milk powder out. (you can use another kind of milk if you want: almond, oat milk ecc.)
Well I guess the challenge is to bake a bread with as much bran as possible without eating chipboard or cardboard.

And it turned out better than I expected. I used 75 g wheat bran (a loaf) on top of the whole wheat flour, the bran was pretty fine.

2 methods: 2nd one( left) & 1st one (right)
I did a little test with two methods of kneading:

The first one. I kneaded the dough without the added bran, so that the gluten were already strong, in the meantime soak the bran in some water. I used less water than the recipe; about 60 g water on 75 g bran, but it will depend on the bran. Add the soaked bran after kneading the rest for at least 8 minutes and knead it in (my machine was on 1) until combined, this takes several minutes.

The second one. I added everything (except raisins and nuts) to the bowl at the same time and kneaded until I could pull a window from the dough. This used 40 g less water. Even though both doughs ended up moist.

There was just a little difference, in the first one the air was more evenly distributed and seemed a little lighter. But nothing shocking.
I used 100 g soaked raisins and 100 g coarsly chopped pecans for each loaf.

I think it's best kneaded long and slow, but too long is possible as well, as the gluten are already 'bothered' by all that bran, keep the gluten strands as strong as possible, so check the window pane from time to time.

I baked for 40 minutes, I think it really needs that, because the dough is moist and heavy and otherwise the sides of the loaf may collaps. Do cover with foil if the top gets too dark. Leave it to cool completely before slicing.

This morning we had it for breakfast. Our boy prefers his bread as light as possible (read: white), so he skipped this one and ate yesterdays' bread (whole wheat!). But my husband LOVES this bread, in his view it's the more fibre (seeds, kernels ecc) the better (I knew that). So that was a hit!

I prefer my bread divers (sometimes white, sometimes ww, sometimes in between) but always without brick-qualities and moist. And this was delicious! It really was, I wasn't expecting that myself to be honest. I put some Gouda cheese on it and it was just great. I personally loved the raisins in it... yes I have a sweettooth.

So for me it was a succesfull recipe. Now there is the challlenge to make this with the largest amount bran given a 100 grams!

And it can be done! I've baked the bran bread again, but now with 100 g additional wheat bran! I had a different kind of bran now, these were a lot coarser. It seemed like an awful lot of bran when I weight it. I pre-soaked them with 300 g of water (which turned out to be a bit too wet, so I had to add a little more WWflour in the end). I baked one large loaf in my pullman pan with the lid off. I used the first method of the dough making, just because it makes sense to me adding this much gluten disturbing stuff. And it worked
Whole wheat bread with 100 g added coarse wheat bran
It would be great if you could join this challenge, how much bran can you add to still make good edible bread?  Get your bag of bran, knead, post and let us know how it went. And join us as a Bread Baking Buddy, send you results and what you thought of this to the Kitchen of the Month (that's me this time!) type BBB Brab Bread as subject to notitievanlien(at)gmail(dot) com and you'll be send a Bread Baking Buddy Badge that you can add to your blogpost if you like. Deadline the 29th of June. Take on the challenge and let's bake!
Bran Bread
(makes 2 loaves)
(PRINT recipe)

500 g whole wheat flour
300-380 g water
50-100 g (organic) wheat bran (1 used 75 g/1 cup)
+ Extra water for the bran (± 2 g water per 1 g bran)
20 g fresh yeast or 7 g instant dry yeast
1 TBsp malt flour (light or dark) (or honey)
30 g butter
1,5 tsp fine salt
50 g milk powder (you can also skip this and substitute the water with milk)
200 g walnuts (or other nuts), coarsely chopped (you can also use raisins instead or ½-½)

Mix the yeast with 3/4 of the water, malt flour or syrup (or honey), butter, milk powder and the bran (and additional water), add some of the WW flour, salt and start mixing it adding the rest of the WW flour and if needed the rest of the water. Don't put everything in at once, you can always put more in later when the dough is almost ready. The dough has to be moist and sticky

As the bran in the flour and the added bran take time to absorb the water, leave the mixture to rest for about 10 minutes. Now check the  consistence and decide if there is more water needed. Start kneading the dough, the dough should not be very sticky after a minute or 6.
Put the dough in a lightly greased bowl, cover and leave to rise for about 1 hour.

While the dough is rising: Soak the raisins for about 20 minutes in lukewarm water, pat dry with a kitchen towel and leave them on a dry tea towel to dry a little further. If you use nuts you can do the same, the soaking time will be longer about 40 minutes.

Turn the dough out on a lightly floured surface and press or roll it out flat in a big oval. Divide ⅔ of the nuts and/or raisins over the dough, fold the dough in two, press or roll out again and sprinkle on the remaining nuts/raisins. Roll the dough (jelly roll style) and divide in two. Or make one large loaf.
Take one half and place it on the counter and press the escaped nuts/raisins back in the dough, press it down a little and shape it to a round, without working the dough, but by rolling it between your cupped hands on the surface. Repeat with the second half of the dough and place the dough balls on parchment paper. You can also shape the dough into a log and place it in a greased baking tin.


Now cover with lightly greased plastic plastic. Let it rise for about 45 minutes in a warm and draft free spot. Check if it's ready to bake by pressing a floured finger in the dough, it the dent springs back, leave it to rise longer, if the dent doesn't disappear, it's ready to bake.

Preheat your oven (preferably with an oven stone and a metal tin on the bottom of the oven) to 200ºC (400ºF).

Make slashes in the dough and put them in the oven (on the stone if you have it), pour some water in the metal tin to create steam and quickly close the oven door. Bake for about 30-40 minutes. Check the temperature of the bread (95ºC/200ºF) to be sure it is cooked.If the top gets too dark before the bread is done, cover with tin foil. Take the loaves out and leave to cool completely on a wire rack.

(Adapted from: “Pane e roba dolce” - Sorelle Simili)

Sunday, August 16, 2015

A little malt flavour again at the Bread Baking Babes (we love that)

Another month, another Bread Baking Babes bake on the calender. Elizabeth ("Blog from OUR kitchen") pick an Italian recipe. YAY I love Italian breads. Elizabeth is under the spell of malted grains of late, so in this bread she took her chance of adding crushed malted rye berries. I couldn't get hold of those, so I used my malted wheat flakes, that I had left from our Granary loaf. I love that malted taste a lot too. You can also use malt syrup. This loaf is made in an 'eight'shape. Why? Well why not. I can tell you this bread is very fluffy, airy and light and we all loved it here. I baked it once before in 2006, then I used malt syrup. Both were totally delicious and very good for daily bread/sandwiches.

To get inspired check out the "8's" baked by the Babes, you can find the links of the Babes who baked this month at the end of this post: they'll be added as they've posted. Have a go and bake along as our Bread Baking Buddy! You knead, bake, post and send your details to Elizabeth so she can send you a Bread Baking Buddy Badge (to add to your post if you like) and add you to the round up later. Deadline 29th of this month. Have fun.

L'otto di Merano
(makes 1 large loaf)
(PRINT recipe)
Starter
300 g water luke warm
0.5 g active dry yeast
25 g malted wheat flakes
75 g dark rye flour
100 g unbleached all-purpose flour


Dough
60 g water, lukewarm
2 g active dry yeast (I used 1g active dry yeast)
27 g olive oil
400 g flour (300 g bread flour + 100 g wholewheat flour)
10 g salt
1 heaped tsp fennel seeds

starter: On the evening before baking the bread, pour the warm water into a medium-sized bowl and whisk in the tiny amount of yeast. Add the flours and maltedwheat flakes and, using a wooden spoon, stir the mixture 100 times. Cover with a plate and leave overnight on the counter.

baking day: Pour the water into a container. Whisk in the rest of the yeast until it has dissolved. Pour this mixture into the starter (that should be bubbling nicely). Add oil, flour, salt, and fennel seeds to the starter. Using a wooden spoon, stir to combine.
Knead the dough in the bowl of a stand mixer (or by hand if you prefer) until the dough is smooth and elastic. Cover the bowl and leave to rise until doubled.

Line a peel with parchment paper. Turn dough out onto a lightly floured board. Divide the dough in two and form into two rounds, one of which is slightly larger than the other. Place the rounds close together on the parchment paper to form a figure 8. Cover with a clean tea towel and allow to rise in a draft-free area at room temperature until it has almost doubled.


Preheat the oven with a baking stone on the middle shelf, turn the oven to 200ºC.

When the oven is hot, just before putting the bread in the oven, spray the top liberally with water (or steam the oven). Put the bread into the oven and immediately turn the thermostat down to 180ºC. Bake for about 40 minutes or until the internal temperature is about 96ºC. Remove the bread from the oven. Remove the finished bread from the oven and put it onto a footed wire rack to cool.

(based on a recipe in "The Italian Baker" by Carol Field)


This linky list is now closed.

Saturday, May 16, 2015

The Bread Baking Babes put on their slippers

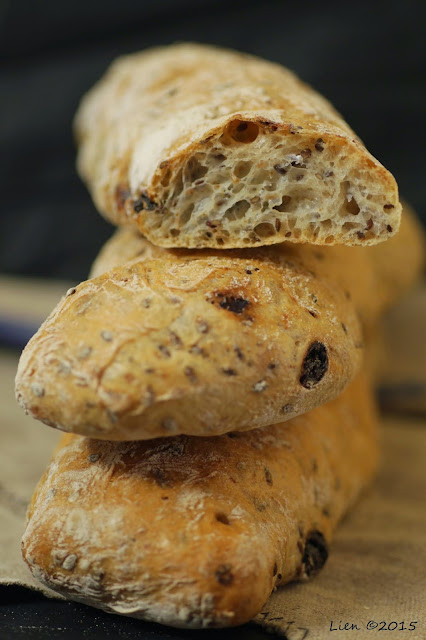
This month the Babes bake a style of loaf I used to bake often, but haven't for years. And that's strange, because I love this kind of bread a lot, I guess there are too much great breads to bake. So I was looking forward to the recipe chosen by Babe-Baker Cathy ("Bread experience") a ciabatta with prunes and flaxseeds. You can add whatever is in your cupboard or what you like. I liked this combination a lot, but next time I think I will add a mixture of seeds .and no fruit, so it goes better with a (Italian) meal. This recipe really worked very good, no problems as long as you're gentle with the dough. I love that folding technic. The hydration is 80% if I did my maths right (I didn't included the water in the flaxsoaker, I didn't know if I was supposed to) and that give the bread nice shiny holes and chewy crumb. Thanks Cathy for this wonderful spot on recipe and having me bake ciabatte again!

Wanna bake some great loaves too? You can, become our Bread Baking Buddy and bake along. Tell how your breads turned out, post on your blog and send all you details and results to Cathy (she's the May kitchen of the month). She'll send you a Bread Baking Buddy Badge for your efforts (you can add that to your post if you like) and Cathy will put all the entries together in a round up later. Deadline for entering is the 29th of this month

Flaxseed and Prune Ciabatta-Style Loaves
(makes 2 or 3 loaves)
(PRINT recipe)
Flaxseed soaker:
48 grams flax seeds
72 grams water
Mix all ingredients until well incorporated, cover and set aside. Let it sit for at least one hour.

Poolish:
125 grams bread flour
125 grams water
pinch of instant yeast
Mix all ingredients until well incorporated. Allow to ferment 12 – 14 hours at room temperature (21°C)

Final Dough:
300 grams unbleached all-purpose flour
50 grams whole wheat flour
25 grams whole rye flour
278 grams water
10 grams salt
84 grams prunes
2 grams instant yeast

Mix together all the ingredients except the flax seeds, and plums. Once everything is thoroughly incorporated, mix in flax soaker and dried plums. Transfer the dough into an oiled container. Dough Temperature: ± 25°C. Let it rise and give the dough 3 folds (1st fold after 45 minutes than the other two 45 minutes apart).
Preheat the oven to 250ºC long enough to get a very hot ovenstone in your oven.

Tip the dough out of the container on a floured surface. Gently spread the dough into a large rectangle without degassing it too much. Sprinkle some flour on top and cut with a metal dough scraper into two or three long rectangles. The dough is divided by measurement. Place loaves on a floured couche. Rest for 20 minutes at room temperature.

Use a board to transfer the loaves from the couche to the baking stone.
Bake the loaves on a preheated baking stone on the bottom shelf and an iron skillet (with stones it it to create steam) under it.  Place the loaves in the oven, create steam by pouring hot water in the skillet, close the door and and turn the oven down to 230ºC. Bake for 15-25 minutes, depending on the size of your loaves. They should have a deep brown colour.
Let them cool a on wire rack.

(adapted from Cathy’s formula)
______________________________________________________________


Deze maand vouwen en bakken bij de Bread Baking Babes

Deze maand bakken we een type brood dat ik al heel vaak heb gebakken, maar eerlijk gezegd is dat ondertussen al weer een poos geleden. En dat is eigenlijk vreemd, omdat het één van mijn favoriete broodsoorten is, maar ja er is ook zoveel te bakken. Dus ik had zin om deze maand weer eens een ciabatta-achtig brood te maken, uitgekozen door onze Bakker-Babe Cathy ("Bread experience"): een ciabatta met pruimen en lijnzaad. Je kunt ook andere dingen toevoegen naar smaak en kastinhoud. Ik vond deze combinatie zelf erg lekker, maar de volgende keer ga ik denk ik alleen verschillende zaden/granen gebruiken, zodat het brood ook beter bij een (Italiaanse) maaltijd past. Dit recept werkt eigenlijk zonder problemen. De vouw-techniek is ook handig voor wat natter deeg en werkt prima. De hydratatie is 80%, als ik het goed uitgerekend heb tenminste (het water voor het weken van de lijnzaad heb ik niet meegerekend) en dat geeft mooie gaten en een licht "chewy" kruim.

Heb je zin ook dit brood te bakken? Bak dan met ons mee als Bread Baking Buddy. Vertel hoe jouw broden geworden zijn, maak een foto, post op je blog en stuur je gegevens naar Cathy, die deze maand de Keuken van de Maand is. Zij stuurt je dan een Bread Baking Buddy Badge (die je bij je blogpost kan plakken als je dat wilt) toe en zal jou inzending bij de andere Buddies plakken in een nieuw bericht op haar blog. Deadline van inzenden is de 29e van deze maand.

Ciabatta brood met lijnzaad en pruimen 
(2 - 3 broden)
(recept PRINTEN)
Lijnzaad voorbereiding:
48 g lijnzaad
72 g water
Meng alle ingrediënten, dek af en zet apart. Laat het minstens een uur staan.

voordeeg:
125 g brood bloem
125 g water
snufje droge gist
Meng alle ingrediënten goed. Dek af en laat het 12-14 uur op kamertemperatuur staan (21°C).
Deeg:
300 g brood bloem
50 g volkoren tarwemeel
25 g volkoren roggemeel
278 g water
8-10 g zout
84 g gedroogde pruimen, in stukjes
2 g droge gist
+ al het voordeeg
Meng alle deeg ingrediënten, behalve het lijnzaad en de pruimen.Als alles goed vermengd is, meng je ook het lijnzaad en de pruimen erdoor. Doe het deeg in een grote ingevette bak. Deeg temperatuur is ± 25°C. Laat het deeg rijzen en vouw het deeg drie keer in het begin van de rijstijd met tussenpozen van 45 minuten). Het vouwen doe je door (met een natte hand) het deeg vanaf de zijkant over het midden, draai de kom een kwartslag en herhaal tot je alle zijkanten hebt gedaan. Draai het deeg op de kop en laat het weer rijzen,. Je voelt het deeg sterker worden.
Verwarm de oven voor op 250ºC, lang genoeg om de ovensteen goed heet te krijgen. Verwarm ook een metalen bakje mee met wat steentjes erin.
Keer het deeg om op een bebloemd oppervlak. Trek het deeg voorzichtig uit tot een grote rechthoek, zonder er teveel lucht uit te drukken. Strooi wat bloem op de bovenkant en verdeel het deeg met een metalen deegschraper in twee of drie lange rechthoeken. Je verdeelt het deeg op het oog (je hoeft het niet te wegen) Leg de broden op een bebloemde couche (of theedoek). Laat het 20 minuten rijzen op kamertemperatuur.
Gebruik een smal plankje om de broden van de couche/theedoek te verplaatsen naar de ovensteen. Bak de broden op de voorverwarmde ovensteen. Giet een flinke scheut heet water op de steentjes in het metalen bakje om stoom te creëren, sluit snel de deur en verlaag de temperatuur naar 230ºC. Bak de ciabatte ongeveer 15-25 minuten, afhankelijk van het formaat van de broden. Ze moeten een mooie bruine kleur hebben. Haal ze uit de oven en laat ze afkoelen op een rooster.
(bewerkt naar het recept van Cathy “Bread Experience”)