Showing posts with label flatbread. Show all posts

Thursday, March 7, 2019

Maak eens een curry!! Review "The Curry Guy Easy" van Dan Toombs.


Wat later dan de bedoeling wegens persoonlijke omstandigheden, maar dan toch nu eindelijk de review van Dan Toombs “The Curry Guy Easy” uitgegeven bij Good Cook. Dit boek is het vervolg op zijn eerste boek “the Curry Guy”. In 2010 begon Dan Toombs zijn blog over curry’s waar deze boeken uit volgden. De curry-recepten zijn verzameld tijdens zijn rondreis langs de Indische restaurantkeukens in Engeland, waar de curry zeer geliefd is.

Easy?
Het eerste boek werd goed ontvangen, maar er werd toch wat gemopperd over de moeite en de tijd die het kostte om een Indisch gerecht te maken. En inderdaad zijn de ingrediëntenlijsten vaak al heel lang voor een gerecht, met name door de vele specerijen. Toombs geeft in dit “easy”-boek tips om tijd te besparen, zoals het gebruik van voorgesneden uien, kant-en-klare knoflook-gember pasta. en hij geeft recepten voor klassieke currys (aangegeven door een symbool met KC), waarbij je een vooraf gemaakte basissaus gebruikt en gegaard vlees. En zelfs voor die basissaus geeft hij een snellere manier. Ook kruidenmengsels die je in de supermarkt of online kan kopen werken sneller dan die ter plaatse te mengen, zoals bijv. garam masala.

Ik kan geen vergelijking maken met het eerste boek (“The Curry Guy”), want ik ken het niet. Maar toch kosten deze recepten wel wat tijd, ga er niet van uit dat het met een half uur op tafel staat, want de snelheid van een chef hebben de meesten van ons niet. Soms vooral prep-tijd, marineertijd en soms gewoon tijd die nodig om het gerecht te garen. Maar deze gerechten zitten vol smaak en dat heeft volgens mij gewoon tijd nodig om zich te ontwikkelen in het gerecht, bespaar eventueel tijd door kant en klare specerijenmengsels te gebruiken maar laat het je er vooral niet van weerhouden deze heerlijke gerechten te proberen, het is echt de moeite waard!

Het boek
Nu eerst even verder met het boek. De eerste indruk is prima. Het is een stevig, maar niet te groot boek (22,5 x 17,5 cm), wat ik persoonlijk ideaal vind als je eruit aan het koken bent. Een groot boek kan ik soms niet goed kwijt op het aanrecht. Het recept is duidelijk en overzichtelijk op één pagina weergegeven, met (bijna altijd) een prachtige, smakelijke kleurenfoto van het gerecht op de tegenoverliggende bladzijde.

Op de voorkant staat het al: “Meer dan 100 eenvoudige curry’s en bijgerechten uit de Indiase keuken” bevinden zich in het boek. Dus voor een ieder wat wils en meer dan genoeg om een heel Indiaas buffet klaar te maken.

Na wat uitleg over het kookboek en tips om tijd te besparen, komen we bij de recepten.
Het eerste hoofdstuk: Voorgerechten. Verschillende gerechten, die ook geschikt zijn als je een meergangenmenu maakt. En echt voor ieder wat wils, van soep, tot vegetarische aardappelhapjes of mihoen, een currysoep (ook vegetarisch), mosselen of een gerecht met makreel. Maar natuurlijk ook met kip en zelfs een gerecht met Indiase specerijen gefrituurde haggis ( met orgaanvlees gevulde schapenmaag uit Schotland)… nou dat vind je natuurlijk niet in India, maar is bedacht door een Indiase restauranthouder in Glasgow.

Topcurry’s, die staan in het tweede hoofdstuk. Met kip, lam, eend, varken, vis of vegetarisch, dat vind ik ook leuk aan dit boek dat er echt voor iedereen wat bij staat. Uit dit hoofdstuk heb ik de Kip Masala Curry gemaakt (zie recept hieronder). Eén van de bekendere curry’s denk ik. Echt superlekker als hij vers gemaakt is.

Klassieke curry’s komen in het volgende hoofdstuk aan bod. Dit zijn normaal gesproken curry’s die veel tijd kosten. Om ze toch sneller te bereiden, moet je o.a. vooraf een basissaus maken, je maakt daar dan veel van, die je in porties invriest, zodat je niet elke keer eerst de basissaus hoeft te maken. Er worden twee manier aangegeven; Een snelle en eenvoudige basiscurrysaus die je in ongeveer 30 minuten maakt(7 tot 8 porties) met wat minder ingrediënten dan de gewone basissaus, waar je wel 14-16 porties mee maakt, maar 70 minuten over doet (dat is incl. kooktijd, dus je bent niet zelf steeds bezig).
Ook wordt er vooraf gegaard vlees gebruikt (bijv. van het Kip masala curryrecept), dan moet je dus wel heel wat maken. Ik ga me hier nog wel eens aan wagen, maar heb toch wat moeite dit te zien als een snel en makkelijk currygerecht.
Dan staan er nog 4 andere snelle basissauzen in dit hoofdstuk, o.a. kormasaus, die je kan combineren met een hoofdingrediënt naar keuze.

Visrecepten is een kort hoofdstuk. Van zalm tot krab en de Masala Machli, die je met diverse soorten vis kan maken staat zeker nog op mijn to-do-lijst, die ziet er zo smakelijk uit!

Natuurlijk is er een hoofdstuk aanwezig met Snelle vegetarische curry’s en bijgerechten. Bloemkool (een paar keer), paneer, spinazie en zelf broodjes met curry erin passeren onder andere de revue. Zelfs Masala-frietjes die je maakt met diepvriesfriet kan je op het menu zetten.

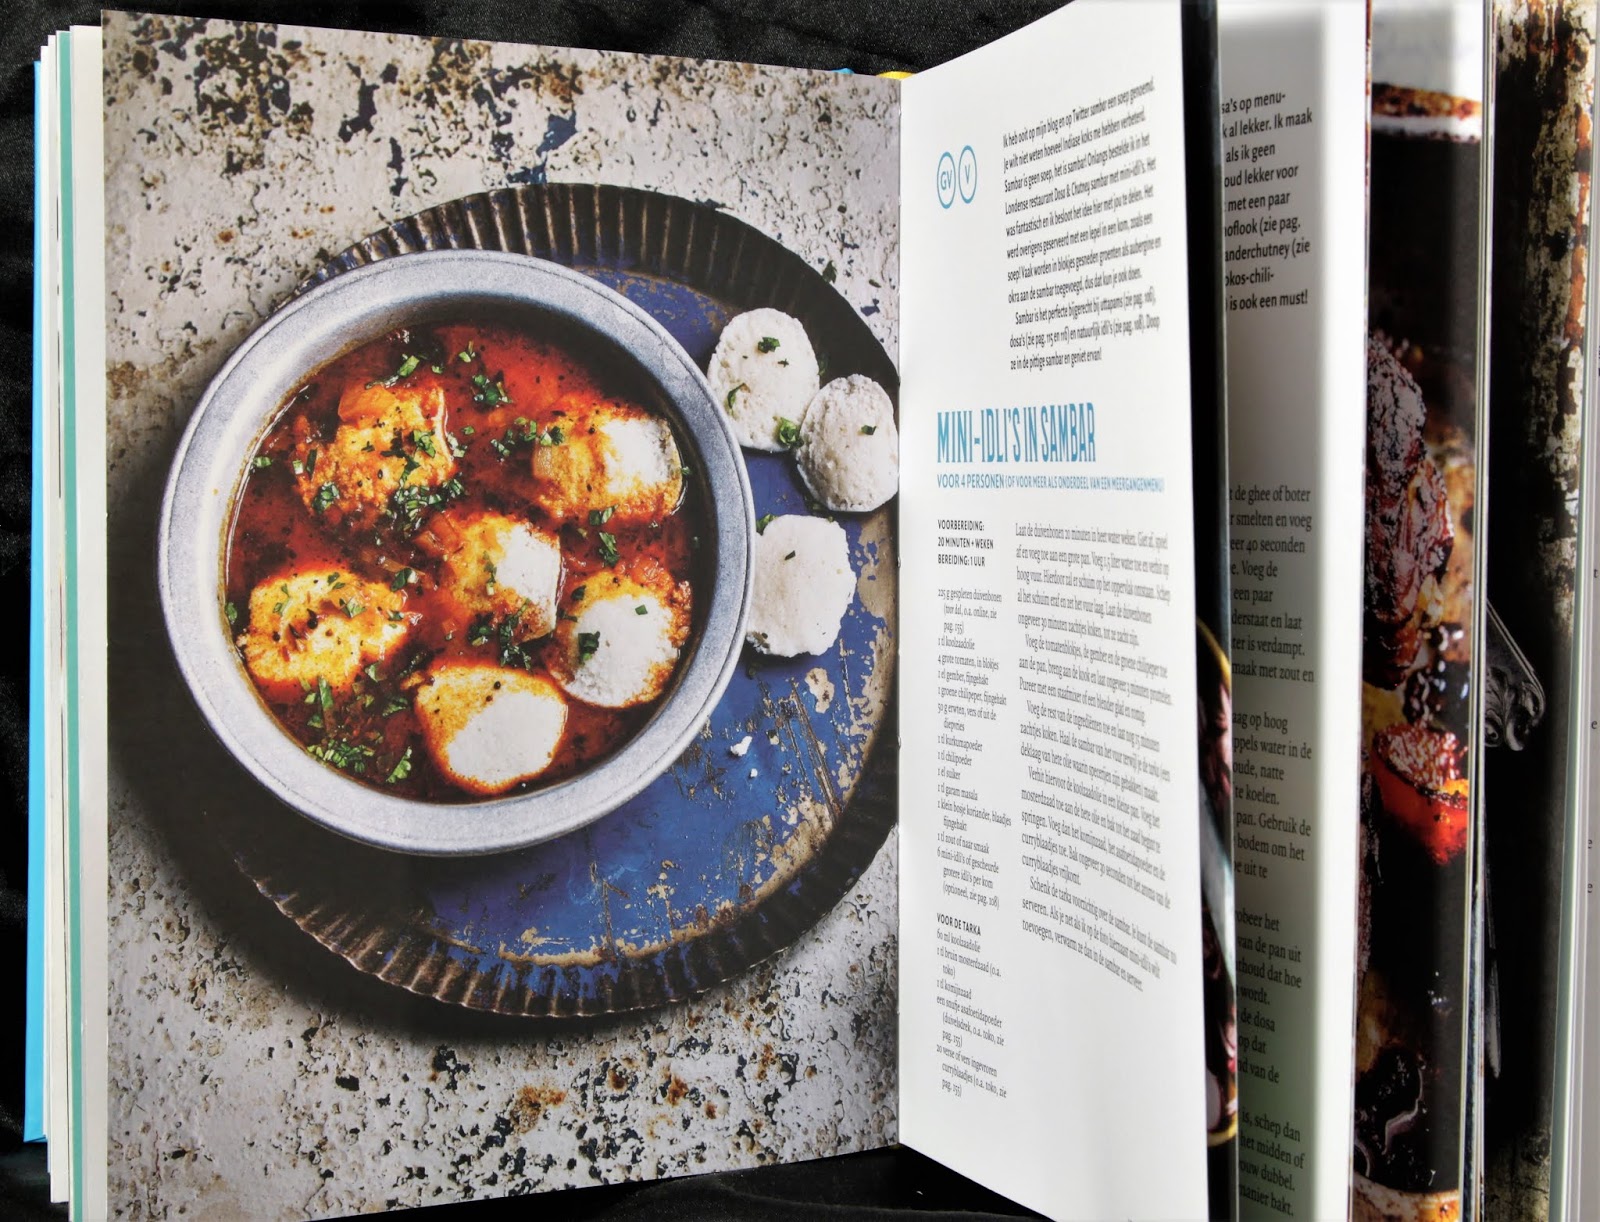
Uttapams, idli’s en dosa’s heet het volgende onderdeel. Ik kende daar alleen de dosa’s van, een soort dunne pannenkoek met een heerlijke vulling, de aardappeldosa’s zijn het bekendste. Uttapams zijn in feite dikke dosa’s waar diverse groenten in meegebakken worden. De idli’s zijn kleine deegrondjes die gestoomd worden, je kunt ze daarna eventueel ook nog bakken.
Voor het maken van deze drie baksels kan je hetzelfde beslag gebruiken (alleen bij de dosa laat je het bakpoeder weg). Net als bij de Klassieke Curry’s staan hier ook een snel en een authentiek beslag voor deze drie baksels. Altijd leuk om een keer uit te proberen.

Tandoori grillen en roosteren zal niet voor iedereen weggelegd zijn. Een Tandoori-oven zal niemand thuis hebben, maar Dan Toombs geeft recepten om dit in de bbq buiten te bereiden. Voor degenen die dat niet kunnen of willen, geeft hij er alternatieve manieren bij om het in de oven te doen. o.a. Kip Tandoori, Shawarma kebabs en Kip piri-piri…. was het maar vast weer zomer!

Tot slot Bijgerechten. Dit is het enige hoofdstuk waar geen foto’s bijstaan. Dingen voor erbij om zelf te maken, en dat hoeft natuurlijk ook niet op dezelfde dag dat je een hoofdgerecht maakt, als je bijv. een chutney maakt. Diverse chutneys, sauzen (o.a.yoghurtsaus oftewel raita), salades en verschillende rijstbereidingen. Op de laatste receptenpagina’s twee broodrecepten, waar de Naan natuurlijk niet kan ontbreken.

Achterin nog wat uitleg over de ingrediënten en waar ze te krijgen zijn.

Mijn kijk op het boek:
Al met al een boek vol curry recepten waar voor elke smaak wat in staat: kip, lam, varken, vis, vegetarisch. Van Hoofdgerechten tot bijgerechten, snacks en brood. Het is een boek waar voor sommige dingen een snellere methode in staat, maar toch kost het tijd. Kijk bij mijn tips na het recept. Maar die tijd is het waard, want de specerijen die de Indiase keuken zo bijzonder maakt, komt in het boek tot leven.
Fijn formaat boek in de keuken met prachtige kleurenfoto's van Kris Kirkham.

Ik ben begonnen met een redelijk eenvoudige maar overheerlijke curry met kip: de Kip Masala. Niet moeilijk te maken en echt superlekker! Probeer het ook eens.

Kip Masala curry
(voor 8 personen of voor meer als onderdeel van een meergangenmenu) 
 (recept PRINTEN)
3 el koolzaadolie
1 tl komijnzaad
1 tl korianderzaad
1 gedroogd kassieblad of laurierblaadje
4 uien fijngesneden
1 el komijnpoeder
1 el korianderpoeder
2 el knoflook-gemberpasta
1 tl chilipoeder (of naar smaak)
1 tl kurkumapoeder
4 grote tomaten in kleine blokjes
1 tl zout
100 ml tomatenpassata
1,6 kg kippendijen, met bot zonder vel (ik heb kippendijen zonder vel en bot gebruikt)
1-2 tl garam masala
Verhit de koolzaadolie in een grote pan met deksel op middelhoog vuur. Voeg dan het komijnzaad, het korianderzaad en het kassie- (of laurier)blad aan de hete olie en bak ongeveer 30 seconden. Voeg de fijngesneden ui toe en bak ongeveer 10 minuten zacht en glazig. Roer het komijnpoeder, het korianderpoeder, de knoflook-gemberpasta, het chilipoeder en het kurkumapoeder erdoor, gevolgd door de tomatenblokjes, en laat 5 minuten op middelhoog vuur pruttelen.
Voeg het zout toe, waardoor het vocht uit de ui vrijkomt. De uit en de tomaten beginnen dan uit elkaar te vallen, waardoor er een dikke saus ontstaat.
Roer de tomatenpuree/passata erdoor en bak 30 seconden. Voeg dan de kippendijen toe. Roer goed door en schenk er zoveel water bij dat de kip net onderstaat. Laat de curry ongeveer 10 minuten met een deksel op de pan zachtjes koken. De saus wordt dan lekker dik en hecht zich aan de kip.
Roer door en voeg nog wat water toe als je een dunnere saus wilt of zet het vuur hoger als de curry nog te dun is. De curry is klaar als de olie boven komt drijven. Schep de olie er af.
Roer er 1 theelepel garam masala door en proef of je meer wilt toevoegen. Ik gebruik meestal zo’n 2 theelepels garam masala, Voeg indien nodig meer zout toe.

(uit: “The Curry Guy Easy” - Dan Toombs)

 ____________________________________________________

MIJN TIPS
Ik maak de laatste tijd zeer regelmatig Indische gerechten, omdat ik gewoon gek ben op al die specerijen in het eten. Ik heb ook niet altijd tijd om zo lang in de keuken te staan, dus nog een paar tips van mijn kant.

-        Laat je niet afschrikken door de lange lijst ingrediënten, het zijn voornamelijk specerijen waardoor de lijst lang is.

-        Toch blijven sommige ingrediënten moeilijk te krijgen, afhankelijk waar je woont. In de randstad zal het wat makkelijker zijn dan in het Noorden/Oosten van het land. Ik heb bv. veel pogingen gedaan om verse (of ingevroren) currybladeren te krijgen, maar het is me niet gelukt. Ik heb wel de gedroogde, maar die smaken eigenlijk nergens naar. Ik heb zelfs geprobeerd om, in onze daarvoor perfecte afgelopen warme zomer, ze uit zaad op te laten groeien.. tot 3 pogingen toe! Er kwam gewoon niets uit de grond! Ik sta nu ergens op een wachtlijst voor een plant, maar daar moet ik wel 1 of 2 jaar geduld voor hebben. Maar ik kook dan gewoon zonder die bladeren en dan wordt het toch ook heel lekker!

-        Online is heel veel te krijgen (pit-pit.com, kruidenkaravaan.nl), maar kijk ook in Turkse winkels, Toko’s, of bij de kruidenkraam op je markt.

-    Basis-specerijen voor Indiaas koken die onmisbaar zijn in je keuken: Koriander (zaad- en poeder), komijn (zaad- en poeder), garam masala, chilipoeder, kurkumapoeder, zwart mosterdzaad. Dit is in elke supermarkt te krijgen en dan kom je een heel eind.

-        Mis-en-place: Zet alles klaar in kleine bakjes, op volgorde van het recept, eventueel een paar uur eerder, zodat je de ingrediënten snel in de pan kan doen, omdat sommige dingen echt maar een paar seconden moeten bakken voor het volgende ingredient erin moet en dan kan je snel doorwerken.

-        Houd je niet van té pittig? Begin met een kwart van de chili (poeder en verse pepers) die in het recept staat en leer zo hoe pittig je het wilt/kunt hebben.

-        Maak als je weinig tijd hebt 1 gerecht uit het boek en geef er gewoon witte- of zilvervliesrijst bij, een eenvoudige gewokte groente en een lepel naturel yoghurt. Je hoeft niet altijd een hele tafel vol uitgebreide recepten te maken als je weinig tijd hebt om toch te genieten van de Indiase smaken.

-        Op Dan’s blog zag ik dat hij ook een nieuw boek in de maak heeft: “The curry guy Veggie”. Dat is dus zeker iets om naar uit te kijken, wat mij betreft!

Veel kook- en leesplezier en natuurlijk Smakelijk eten!


Een exemplaar heb ik ontvangen van uitgeverij Good Cook om een recensie over te schrijven, met dank. Deze mening is mijn eerlijke en onbeïnvloedde mening, na het boek uitgebreid bekeken en gebruikt te hebben. 

Friday, June 16, 2017

Bake a purse! BBB in June


Another month with another Middle Eastern recipe for the Bread Baking Babes to bake; thanks Karen ("Bake my day!") for this lovely choice. The fun bread shape looks like a purse and is meant to carry around after buying it from a street cart in Lebanon that sells these. You can bake them yourself and please feel free to parade in your house and/or street! Bake these in a weekend and eat them for dinner or take them on a picnic! Bake with us, taste, post about them en sent your details and findings to Karen (bakemyday(at)gmail(dot)com) and become our Bread Baking Buddy!! Enter before the 30th of this month!

Kaak bread (a Lebanese bread with sesame seeds)
(makes 6 large Kaak)
(PRINT recipe) 

dough:
235 g milk
230 g water
2 TBsp olive oil
1 ½ TBsp sugar
1 ½ tsp salt
1 TBsp instant dry yeast
135 g whole wheat flour
490 gr all purpose flour, you may need a little more, but don’t add too much flour
Topping:
1 egg for egg wash
1 TBsp sesame seeds per kaak
You will also need lined baking sheets
Mix all the dough ingrdients in a standmixer bowl and knead it until souple dough. What you'll be looking for is a malleable non-sticky dough.
Shaping; divide dough into 5 parts of 200 g (or make smaller ones about 100 g each) and ball up. The last part of dough will be smaller, but you add all the cut out circles to that one, so it’ll be about the same size. Let rest to relax and using a dough pin roll each ball into a circle approx. 18 cm diam., about 1 1/2 cm.
Place the shaped breads on lined baking sheets, be careful not to stretch the dough. Use a large cookie cutter to cut out a circle near the top to form the "handle". and loosely cover to rise another 25-30 minutes. Add all the cut-out circles to the last smaller piece of dough and shape this one like a purse without cutting a whole (make a hole with your finger and carefully open it up. Or do it as it’s done in this video https://www.youtube.com/watch?v=cdxMY-53pMU )

Egg wash the breads, sprinkle with sesame seeds.
Bake for ±15-18 minutes or until golden and puffed in a pre-heated oven 200-220°C. I think they will benefit from a bit of steam in your oven. Use your preferred method; either ice cubes, boiling water in a heated pan... bake on a stone...

Let them cool on a wire rack. You can eat them like they are or make a horizontal slit in the bottom part of the purse, which you can fill with whatever your fancy.
We stuffed them with lettuce, tomato, cucumber and some vegetable "sausages"

Monday, May 16, 2016

BBBabes.... spring has arrived!

Our experienced Bread Baking Babe Cathy ("Bread Experience") has picked us a wonderful spring recipe; a spring focaccia, a thin focaccia made with a poolish, fresh lemon slices and topped with some spring greens after baking.

I haven't baked a focaccia in a while and even though it takes time as the dough is folded every 20 minutes in the beginning, but this gives that lovely crisp crust, airy and soft crumb that I really love ánd have been missing without realising it. As topping I kept it simple, lemon slices, black sesame seeds, za'atar, coarse salt. And some fresh herbs after baking. Some here took the lemon slices off before eating the focaccia, but then it still had the lovely fresh lemon flavour from the juices that had gone into the bread. And there were requests to make this again! So this was a winner here, thanks Cathy for this beautiful recipe!

And I can really recommend for you all to bake it too, if you think 4 focaccia's is to much for you, just half the recipe. So give this recipe a try and become our Bread Baking Buddy! Bake, post, and send your findings and details to our Kitchen of the month May: Cathy "Bread Experience" and get a Bread Baking Buddy Badge to add to your blogpost. But most of all you can enjoy this lovely flatbread! Happy baking!

Thin Crispy Spring Focaccia
Makes: 4 x 400 g focaccias
(PRINT recipe)
Poolish:
40 g (100 %) bread flour
44 g(125%) water, room temperature
1/8 tsp instant yeast

Final dough
668 g (80%) bread flour
167 g (20%) whole wheat flour
¼ tsp instant yeast
625 g (75%) - 725 g (87%) water
84 g (All) poolish
17 g olive oil
25 g water (3%), to mix with the salt
17 g coarse sea salt
Topping suggestions
olive oil
coarse sea salt, for sprinkling if desired
fennel seeds, to taste
dried thyme, to taste
lemon slices, thinly sliced
spring mix greens, or other greens as desired
alfalfa sprouts

Poolish:
In a medium bowl, whisk together the bread flour and yeast. Pour in the room temperature water and combine using a wooden spoon. Scrape down the sides of the bowl using a spatula or dough scraper. Cover the bowl with plastic wrap and let it rest on the counter at room temperature (25ºC) for 12 to 14 hours.
Final dough:
The next day, or when ready to mix the final dough, whisk together the flours and yeast in a large bowl. Pour the water and oil over the poolish and mix thoroughly with a wooden spoon or Danish dough whisk to break up the poolish. Add the water gradually, reserving the 25 grams to mix with the salt. Scrape down the sides of the bowl with a dough scraper, cover and let it rest (autolyze) for 20 minutes.
Uncover and sprinkle the salt over the top of the dough. Pour the remaining 25 g of water over the salt to dissolve it.  Using wet hands, thoroughly incorporate the salt into the dough. Scrape down the sides of the bowl, cover with plastic wrap or a kitchen towel and let it rest for 20 minutes.
Sprinkle water on a work surface. Uncover the dough and transfer it to the wet surface. Using wet hands, fold the dough from all sides.  Then gently tuck the seams under and place the dough back in the bowl. Using water on the counter and your hands, alleviates the need to oil the bowl or the work surface. Cover the bowl again with plastic wrap or a kitchen towel and set the dough aside for the third time to ferment for 20 minutes.

Sprinkle water on the work surface again and fold the dough one last time. Tuck the seams under and place it back in the bowl. Cover and set it aside to ferment for 2 hours.

An hour before you plan to bake the focaccia, place a baking stone or tiles in the oven and preheat it to 260ºC. If you plan to use a pan for steam, place it in the oven at this time.

Sprinkle your work surface with water. Transfer the dough to the work surface and divide it into four equal pieces. Depending on the type of flour you use and the hydration, each piece will be approximately 400 g.  Mine were about 410 g each.

Shape each piece into a round and cover with plastic. Let them bench rest for 15 minutes.

Lightly oil two half sheets of parchment paper. Place one dough ball on each sheet. Gently press on the dough to degas it and then shape each piece into a flattish round.  Cover the rounds with plastic wrap and let them proof for 45 minutes.

Uncover the dough, drizzle olive oil over the top and gently stretch each piece into an oval disk the length of the parchment paper, or to the desired size.  Sprinkle the top with fennel seeds, thyme and sea salt (optional) and place thinly sliced lemons, as desired.   
The first time I made these focaccias, I used one lemon to top two focaccias, but it really needed more so for the next batch, I added more lemon slices.

Using a baker’s peel or unrimmed baking sheet, transfer the focaccia (on the parchment) to the preheated baking stone.  If using steam, add ice cubes to the steam pan.  I used my new baking steel with no added steam.  

Bake the focaccia for 10 minutes, or until the loaves are golden brown and crisp around the edges. Remove the parchment paper partway through baking to allow the bottom to firm up.

Remove from the oven and transfer to a wire rack to cool.  Add a handful of the spring mix greens and sprouted alfalfa and tear apart pieces or slice it if you prefer.
Repeat with the remaining focaccias.
(Adapted from: The Fundamental Techniques of Classic Bread Baking by The French Culinary Institute)

Friday, January 16, 2015

BBB make chapatis

This month our lovely hostess of the month is Elizabeth ("Blog from Our kitchen") picked a flatbread recipe for us to bake. They love flatbreads here, especially ones that go with a delicious meal. I made chapatis a long time ago, about time I made some again. So Chapatis were on the menu last week. 

Check out Elizabeth's awesome video how to bake and puff these little breads up like a balloon. As I don't have a stove with flames or electric (I use induction), I didn't get them to puff up like that, but they still were very good. I just pressed them to the pan with a spatula and give them enough heat to bake all the way through. I must admit I had some issues with these, I poured in too much of the water to start with and ended up needing a lot of flour to roll them out. Of course this resulted in a lot of smoke when the flour started to burn in the hot pan, fortunately our fire alarm didn't go off in the room next door. So mine weren't all that they should have been, but still very good. I had big plans to make a delicious rendang, curry, or tikka massala to accompany them, but in the end I just baked some chicken drumsticks, took the meat of the bones and threw several ingredients from the cupboards in (green curry spices, coconut milk, ginger, lemon grass, chili, courgette ... ecc.) and it turned out super delicious in the end (the sauce could have been a little thicker though). We all enjoyed this very much.

Now your mouth is watering right?! So bake along with us and treat yourself (and your family) to home made chapatis and make something delicious to go with them. Bake, taste and tell us about your experiences, send all your details to our kitchen of the month Elizabeth. She'll send you the Bread Baking Buddy Badge (you can add that to your post if you like) and put your entry in a round up later on. Deadline for sending in your admission is the 29th of this month. Have a wonderful time baking!

CHAPATIS, AKA ROTIS (INDIAN FLATBREAD)
(makes 8)
(PRINT recipe)
Equipment
stove
open wire rack (open wire rack on feet so it’s about an inch off the burner)
rolling pin
heavy carbon steel shallow frying pan (tava)
tongs
lidded pot
Ingredients
140 g all purpose flour
70 g whole wheat flour
1/2 tsp salt
up to 1 c. just-boiled water (I used less)
In a bowl, mix flours and salt. Add hot water gradually, stirring with a fork until you have a soft dough. The amount of water will vary drastically depending on air temperature and humidity. You just have to play with it. You are aiming for dough that resembles silly putty. Using as little extra flour as possible, knead on a board or in the air for 10 minutes until the dough is soft and silky.Put the dough back in the bowl. Cover with a damp cloth or plate and let sit on the counter for 30 minutes to one hour.
Put the tava (or iron cast skillet) on medium heat. Do not oil it. Put the wire rack on another burner at the highest heat possible. Cut the dough into 8 equal pieces. Lightly flour each one and put 7 pieces back in the bowl. Cover the bowl.

Form the piece of dough into a ball and flatten it. Roll it out into a round til it is quite thin but not too thin - about 2 mm.  As you roll out the dough, make sure it is not sticking to the board and that there are no holes. Keep the rolling pin lightly dusted with as little flour as possible and the board the same way.
Place the round of dough on the hot tava (griddle). As soon as you see little bubbles form, turn it over using tongs. As soon as there are little bubbles on the reverse side, lift the bread off the tava with the tongs and place it on the wire rack. It should puff up. Turn it over once or twice to ensure that it puffs up completely. Don't be worried to see a few dark brown spots on it. (If you are lucky enough to have a gas stove, you can hold the bread directly over the flame.)

Put the finished bread into a pot and cover it with a lid. Keep it in a warm oven. Roll out the next piece of dough and repeat til you have 8 rotis. As you put a new roti on the stack, turn the finished rotis over to keep the bottom ones from getting wet.
(based on "Flat Wholewheat Bread - Roti" in A Taste of India by Madhur Jaffrey)

Sunday, November 16, 2014

Bread Baking Babes make layered flatbreads

I'm very excited that the lovely Aparna "My divers kitchen" is our kitchen of the month. Secretly hoping for a recipe that was Indian (or from that part of the world at least) that I'd never heard of... and yes she delivered. She found us a wonderfull recipe for small layered flatbreads, the Bakharkhani. This is what she wrote about them:
"Bakharkhani (also called Baqeerkahni, Bakharkhoni or Bakorkhani) are flatbreads that came into the Asian sub-continent with the tandoor and other breads of Turkish and Mughal traders and invaders sometime in the eighteenth century.
Bakharkhani is a layered and very rich bread, made in the manner somewhat like puff pastry, and is popular in Bangladesh, India and Pakistan. In India, it is typically found in states where history, food and culture are influenced by the Mughal rule like Lucknow, Hyderabad and Kashmir.
This flatbread seems to be different in different parts of the world where it exists. It can be a savoury or slightly sweet, leavened or unleavened, soft or crisp, eaten for breakfast or served with tea, and even like a paratha (Sylheti Bakharkhani from Bangladesh). The softer leavened versions of Bakharkhani are usually served with kebabs and meat curries."

Not only a new way to make flatbread, but we also had to make 'Mawa" (never heard of that before) and Ghee (I knew that, but never tasted or used it). Well of course there are shortcuts for both, I thought it would be nice to make both from scratch. The ghee was easy and what a wonderful smell. The Mawa take time, about 1 - 1,5 hours to get 1 litre reduced. It needs stirring, so it's best to make it while you're in the kitchen anyway and you can do your stuff and stirr in between. It's so fun to make something that's totally new and that it works! I love that. I watched the video several times, especially the rolling, folding and shaping, then went ahead and made them. The layers broke open in several places when rolling them out, but even though they don't look as perfect as the ones you can see at Aparna's blog, they still taste very good! We ate some when still warm... and the rest we had with some soup, so not with tea.

Come on and have a go at baking these too. Bake, post and become our Bread Baking Buddy. Check out the information on Aparna's blog how to send in your information and we're looking forward in seeing your Bakharkhani!! Deadline 29th of this month.
Dhakai Bakharkhani
(makes 10-12 small flatbreads)
(PRINT recipe)

Ingredients
Mawa
1 litre full fat milk (2% will also do) - makes approximately 3/4 to 1 cup mava
Dough
2 cups flour, (plus a little more for rolling it out the dough)
1/4 cup mawa
1/4 cup ghee* (plus a little more for spreading on the dough while rolling it out)
1/4 tsp teaspoon salt
2 tsp sugar
2/3 cups water (a little less or more if needed)
Sesame seeds, to sprinkle (optional)
Method:
*Ghee is nothing but clarified butter and should be available readymade in Indian stores. It is quite easy to make your own at home. Since you are making the effort you can make a little extra and store the rest for later use. Ghee can be stored at room temperature and keeps for a while.
Melt 250 g of unsalted butter and let it cook until the milk solids in the butter start turning golden brown (do not burn them) and the liquid fat is a golden colour. You should get a rich aroma from it.
Let it cool to room temperature and then decant or strain the golden liquid into an airtight jar.
Making the mawa
Pour the milk into a heavy bottomed saucepan, preferably a non-stick one. Bring the milk to a boil, stirring it on and off, making sure it doesn’t stick to the bottom.
Turn down the heat to medium and keep cooking the milk until reduces to about a quarter of its original volume. This should take about an hour to an hour and a half. The important thing during this process is to watch the milk and stir it frequently to make sure it doesn’t stick to the sides or bottom of the pan and get burnt. The danger of this happening increases as the milk reduces and gets thicker.


Once the milk it has reduced to about one fourth, 1/4 quantity, lower the heat to low and let cook for a little while longer. Keep stirring regularly, until the milk solids (mawa) take on a lumpy appearance.  There should be no visible liquid left in the pan, but the mawa should be a bit moist and not stick to the sides of the pan.
Let it cool. Once it has cooled, it should still be dry,but a little moist and you should be able to crumble it.
And here are two links to substitutes to mawa (or khoya) which you might prefer to use. made with other sorts of milk & made with ricotta.
Making the Bakharkhani
In a large bowl,  put the flour, salt and sugar into a large bowl. Crumble the mawa into it and mix in. Then add the ghee and use your fingers to rub it into the flour.  Add the water, a little at a time, and knead well until you have a smooth and elastic dough that can be rolled out very thin.

Please see this video to get an idea of how the dough is rolled out, layered with ghee and flour and folded. The language in the video is Bangla but the visual is quite descriptive.

Cover the bowl with cling wrap or a damp kitchen towel to prevent it from drying. Let it rest for about 30 minutes to an hour. Then lightly coat the dough with a little ghee and then let it rest for another 10 to 15 minutes.
Preheat oven to 170ºC (325ºF).

Also lightly coat your rolling pin and board (or your working surface) with some ghee (or oil).Now divide the dough into two portions, working with one portion at a time. Roll out one portion of the dough as thin as possible into a rectangle, without adding any flour. It should be thin enough for you to see your work surface through the rolled out dough!

Brush some ghee (not too much) all over the surface of the rolled out dough with your fingers. Sprinkle some flour evenly over this, enough so that the ghee is absorbed when spread out. The flour layer should be thin. Brush some more ghee, again, over this and then sprinkle some flour over this like previously.


Fold the dough into half and once again repeat the process of brushing the ghee and sprinkling the flour over this twice, as before. Fold the dough for the second time (see the video) and repeat the brushing with ghee and flouring, twice.
Now roll up the dough into a long cylinder and let it rest for about 10 minutes. Pinch off lemon sized balls and roll each one into a small, round flatbread about 4 mm thick and approximately 10 cm in diameter. Sprinkle sesame seeds (optional) and lightly press into the dough. Make three cuts centrally and lengthwise on each flatbread using a knife. Place on parchment lined baking sheets and bake for about 20 to 25 minutes or until they’re light brown on top. Do not over bake. Let them cool and serve with coffee or tea.
(Adapted from Honest Cooking (http://honestcooking.com/bakarkhani-bread/)